We generally keep the pool gate closed when we aren’t down there, largely out of fear that if Biz falls in, there’s no way for him to get out.
Daily Routine:
Run the vacuum robot
- Unplug the power cable
- Put the rubber stopper over the power connection port
- Push down on both sides to make sure the base is connected (you will hear a pop if either side was not connected)
- Turn the nob on the top (the lower part of the power connector) to the ‘on’ position (this nob can get sticky and may need some pressure)
- The robot will start running in ~10 seconds, so lower it into the water and give it shove to get it to the bottom before it starts (I’ve had it spin wildly by starting while not on the bottom properly)
- Toss the floating retrieval ring at the end of the string into the pool
- The robot will vacuum for 90 minutes
Take out the vacuum robot
- Depending where the robot dies, either grab the retrieval ring/string or use the pool broom to pull it within reach
- Pull the robot up to where you can grab it and turn the power position to “off”. If you don’t turn it off, it will start up again a while after being place on the charger and can burn-out
- Pull the robot out of the pool and let it drain for a few seconds before taking it somewhere where you can set it down.
- There are two flaps on either side, between the wheels that need to be pulled outward to pull the top section off the base. Take the top section over to the charger and remove the rubber stopper from the charging port, plug the charger in – don’t press it in too far as it will make pulling off more difficult and prone to snapping the prongs (I’ve done that before)
- Check the charger plug block light- it will be green before you plug it in, but red once charging
- It will take ~5 hours to charge.
- Back at the base, remove the screen and bang it out on any of the hand rails, flip the base to remove all the water and debris
- If either the screen or the base is dirty, take them up to the sink on the deck and run under water to remove the debris
- When the base and screen are clean enough, take it over to the charging top section and reassemble the two halves. Press down on both sides to hear the click of the attachment flaps engaging. They won’t go together of the screen isn’t sitting properly, so if you can’t get them to snap, that is likely the cause- check the screen to make sure it is sitting in the base correctly
Run the Skimmer Robot
- Make sure the skimmer robot’s basket is installed (see the end of this section) and the closing clip is snapped shut
- The skimmer robot is solar powered, so best to run when there is direct sunlight
- There is an on/off switch at the back of the robot. Turn this to “on”
- Drop the skimmer robot into the pool
- NOTE: don’t run the skimmer robot while the vacuum robot is running- the vacuum’s retrieval ring/string will get caught in the skimmer’s collection wheel
Remove the Skimmer robot
You should remove either robot from the pool when swimming. You should also remove the skimmer robot when running the vacuum robot. Otherwise, it’s self-sufficient, so you can leave it in whenever you aren’t swimming or running the vacuum.
- Wait for the skimmer to get close enough to grab
- Turn the on/off switch to “off”
- Bring the robot somewhere where you can set it down
- Flip the basket lid clasp open to access the filter basket
- Remove the basket and bang it on the side of a hand rail or the tree to remove all the debris
- Often the basket gets grimy, so take it up to the sink on the deck and wash it out. Sometimes you might need to use soap and a sponge (both located in the cabinet below the sink) to get the filter basket clean
- Either leave the basket to dry or bring it back to the skimmer base and place the basket back into the skimmer (aligning the gears to known which way it needs to fit) and re-secure the top clip.
Weekly Routine
You’ll want to test the water for Chlorine and PH levels to ensure the water stays clean. To do so, you will need to use the pool test kit, the turkey baster, and the measuring cup, all in the large storage box in the pool area AND the Pool Chem Test app I will send, but can also be found here: https://apps.apple.com/us/app/pool-chem-calculator/id1453351222
Test Chlorine levels/Add chlorine
- Use the turkey baster to draw water sample from the pool
- Fill the smaller, thinner test tube to the fill line
- Follow the instructions on the card- add 5 drops from the yellow lid container #1
- Cover the test tube with the smaller yellow lid cover and give it a shake
- Add the plain white card behind the test tubes to give you a white background to better see the colors
- Compare the sample color to the color scale on the left
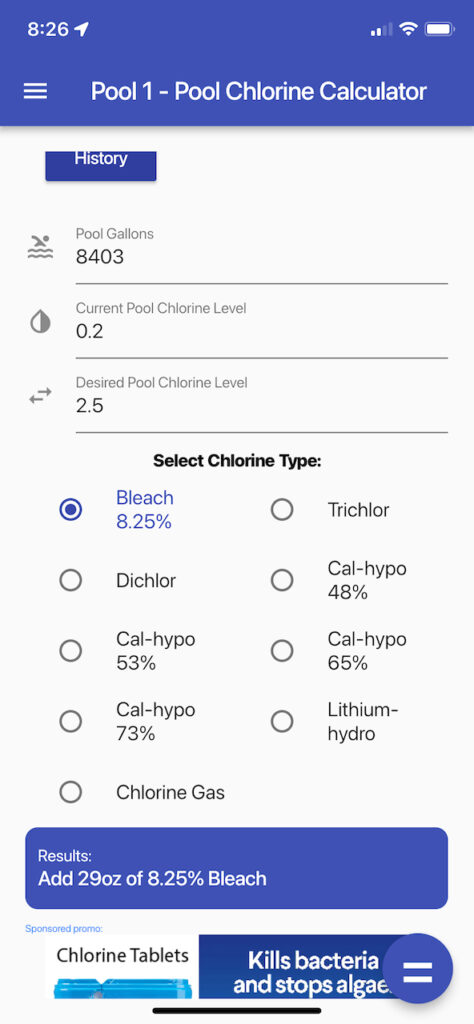
- The “ideal” reading is 2.5 The sample will likely be something else. Open the pool chem app and select the “Pool Chlorine Calculator”. In my example screenshot below, I received a reading of 0.2. Enter the current reading and the “desired” reading into the app (I use 8403 in the “pool gallons”)- click the equals button to calculate how much chlorine needs to be added. We use a 8.25% bleach liquid chlorine, so use that entry. In my example screenshot, it says to add 29oz
- You can toss the sample water into the dirt somewhere and wash it out with water from the pool (I use the turkey baster to squirt pool water into the test tube)
- Take the measuring cup into the “maintenance area” of the pool where all the chemicals are kept. The liquid chlorine is on the bottom shelf. Fill the measuring cup with the chlorine and toss it into the pool (flinging it across the surface will help distribute it). Repeat until 29oz have been added.
- When done, dip the measuring cup into the pool to clean it out.
Test PH levels/Add Muriatic Acid
- Use the turkey baster to draw water sample from the pool
- Fill the thicker test tube to the fill line (the more full one- there is a lower one for a different test that you can ignore)
- Follow the instructions on the card to test PH- add 1 drop of bottle #4, then add 5 drops of the red lid #5
- Place the red cap on the test tube and give it a shake
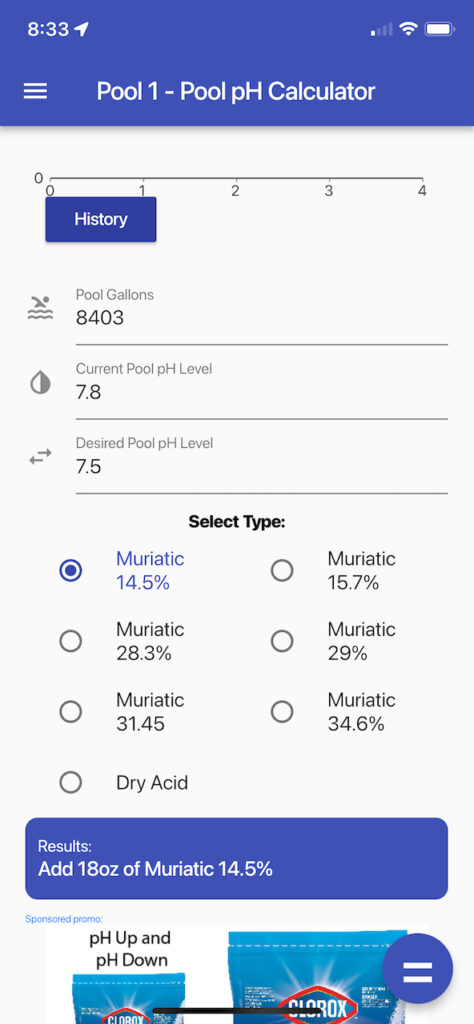
- Compare the color of the sample with that of the color scale to assess the sample’s numeric value. In the screenshot below, the sample was 7.8
- Open the Pool Chem Calculator app and go to the “Pool PH Calculator” app
- Enter the Current and Desired (pool gallons should be 8403). We use 14.5% Muriatic acid, so make sure that option is selected. Click the equal button to see the suggested amount needed. In my example below, it asks for 18oz.
- Go down to the “maintenance area”. The Muriatic Acid container is on the top shelf. Pour the desired amount of acid into the measuring cup and toss into the pool.
- IMPORTANT: NEVER MIX MURIATIC ACID AND CHLORINE IN THE SAME CONTAINER- IT WILL CREATE A GAS CLOUD THAT CAN KILL.
- When done, dip the measuring cup into the pool to clean it out.
Add Algicide
As a precaution, every week or so you should add 20-24oz of Algicide. It kills off algae growth to keep the water clear. If you ever see the water start to get cloudy, you should first test the chlorine and PH levels to make sure they are desirable, and then follow the instructions on the back of the container for cloudy water. The Algicide is in the “maintenance area” on the middle shelf.
Occasional Tasks
Add water to pool
There is a steady drip at the solar heaters and natural evaporation, so the water level will decrease over time. We want to make sure the water level is always above the pump outlet. You can tell when water needs to be added because the water coming out of the pump in get louder as the stream is exposed. We keep a hose at the pool, so you just need to move the end into the pool and turn on the water at the valve under the deck. My biggest fear hear is forgetting to turn the water off and flooding the downstairs neighbors, so I usually set an alarm for half and hour or so to remind myself.
Add Chlorine tablets to bear float
We have a polar bear float chlorine dispenser that contains a couple chlorine tablets. I refilled him before we left and that SHOULD be enough to cover you while we’re away, but if you ever see that he’s empty, add the last chlorine tablet from down in the maintenance area. It’s not essential, so there’s no harm done if it runs out. However, those floats have a tendency to self-destruct over time, so if you ever see the bear has sunk to the bottom of the pool, please use the net to pull it out. Those chlorine tablets can eat through the pool lining if left in direct contact.